I recently upgraded my mobile plan to include (almost) unlimited data – mainly to support increased email and browsing activities. Also, all the smaller packages were really a waste of money. However, a quick notebook calculation revealed that I would have to send thousands of emails a day in order to even come close to the limits of the new data package. With that in mind, I thought my new found bandwidth would be of more us to me, if I could use my renovated laptop with the mobile data package for roaming mobile internet access. As I have previously posted, my personal laptop is an off-lease Thinkpad X40, running Ubuntu Hardy (8.04). My preferred approach was to share the phone’s Internet connection over bluetooth with the laptop; so, the first step was to get a bluetooth adapter for the laptop. I purchased a no-name usb mini-bluetooth adapter for $10 from TechDirect (http://www.techdirectcanada.ca/), a discount electronics chain in Toronto.
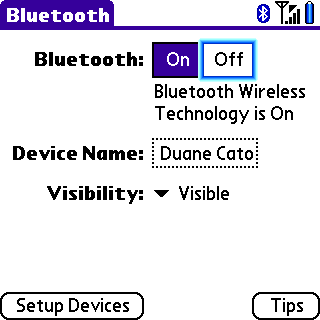
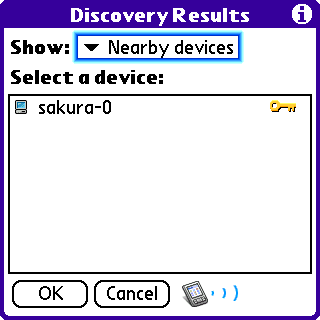
As is often the case with Ubuntu, the bluetooth adapter was detected immediately upon inserting into the usb slot on the laptop; the small bluetooth icon appeared in the toolbar tray, with various options for managing the device. The first step was to pair the laptop with my cell phone (a Palm Centro). This was a fairly simple process: on the phone, I navigated to the Bluetooth application on the Centro (see below), selected Setup Devices, and changed the Discovery pull-down list to show nearby devices. I then highlighted my laptop name in the device list, clicked OK, and entered the a pairing pin when prompted. I was then prompted on my laptop for the corresponding entry, to create the secure connection, which completed the permanent pair between my laptop and phone. This is relevant, since I have hard-coded my setup to work only with my phone. It should be possible to create a more generic setup to dynamically use any Bluetooth DUN-enabled phone for tethering, but that is probably going to be a phase II effort.


The next step was to identify the specific Bluetooth address for my cell phone, and ensure that a rfcomm serial emulation device was created for communication between the laptop and the phone over Bluetooth. In order to do this, I first ran the command:
$ hcitool scan
Scanning …
00:1D:FE:06:A0:6B Duane Cato
This revealed that the address of my phone was 00:1D:FE:06:A0:6B. I then entered the following command to determine the profiles available on my phone:
$ sdptool browse 00:1D:FE:06:A0:6B
Browsing 00:1D:FE:06:A0:6B …
Service Name: Voice Gateway
Service RecHandle: 0x10000
Service Class ID List:
“Handsfree Audio Gateway” (0x111f)
“Generic Audio” (0x1203)
Protocol Descriptor List:
“L2CAP” (0x0100)
“RFCOMM” (0x0003)
Channel: 7
Language Base Attr List:
code_ISO639: 0x656e
encoding: 0x6a
base_offset: 0x100
Profile Descriptor List:
“Handsfree” (0x111e)
Version: 0x0101
Service Name: AUDIO Gateway
Service RecHandle: 0x10003
Service Class ID List:
“Headset Audio Gateway” (0x1112)
“Generic Audio” (0x1203)
Protocol Descriptor List:
“L2CAP” (0x0100)
“RFCOMM” (0x0003)
Channel: 2
Language Base Attr List:
code_ISO639: 0x656e
encoding: 0x6a
base_offset: 0x100
Profile Descriptor List:
“Headset” (0x1108)
Version: 0x0100
Service Name: OBEX Object Push
Service RecHandle: 0x10004
Service Class ID List:
“OBEX Object Push” (0x1105)
Protocol Descriptor List:
“L2CAP” (0x0100)
“RFCOMM” (0x0003)
Channel: 3
“OBEX” (0x0008)
Language Base Attr List:
code_ISO639: 0x656e
encoding: 0x8cc
base_offset: 0x100
Service Name: Dial-up networking
Service RecHandle: 0x10006
Service Class ID List:
“Dialup Networking” (0x1103)
Protocol Descriptor List:
“L2CAP” (0x0100)
“RFCOMM” (0x0003)
Channel: 1
Language Base Attr List:
code_ISO639: 0x656e
encoding: 0x8cc
base_offset: 0x100
Profile Descriptor List:
“Dialup Networking” (0x1103)
Version: 0x0100
From the above command results, we can see that I have the Dialup Networking profile available (which is what is needed to service PPP connections from a client, such as a laptop). So the next step was to configure a PPP connection profile to reach use the DUN profile on the cell phone over the rfcomm device.
There are two ways to create a rfcomm device that makes use of Bluetooth. The first way requires editing the /etc/bluetooth/rfcomm.conf file and adding the settings for the DUN profile found above. Thus for my phone I had:
$sudo vi /etc/bluetooth/rfcomm.conf
and then added:
rfcomm0 {
bind yes;
device 00:1D:FE:06:A0:6B;
channel 1;
comment “Duane Cato Centro GPRS”;
}
The disadvantage of this approach is that it binds the rfcomm device permanently to channel 1 of the Bluetooth connection, which can dynamically change each time a connection is made. This would necessitate updating the /etc/bluetooth/rfcomm.conf config file each time with the correct channel number; more than slightly arduous.
The alternate approach (which I used), makes use of the rfcomm command to dynamically bind the rfcomm device to the channel each time I want a PPP connection:
$ rfcomm bind /dev/rfcomm0 00:1D:FE:06:A0:6B 1
where the channel number is 1.
Now that I was able to dynamically create the rfcomm device connecting to my cell phone Bluetooth DUN, the next step was to create a PPP connection to run over the serial rfcomm device. This is often specific to your mobile provider; since I use Rogers for my cell service, the following worked for me:
$ vi /etc/ppp/peers/provider
debug
noauth
connect “/usr/sbin/chat -v -f /etc/chatscripts/provider”
ipcp-accept-local
noipdefault
:10.0.0.1
local
usepeerdns
/dev/rfcomm0 1152000
defaultroute
crtscts
lcp-echo-failure 0
The entry above will create a default PPP connection over the /dev/rfcomm0 at 1152000 baud. The other options basically say to use the default routing and DNS provided by the PPP server, and make the client a private network client of the DUN provider.
The final step was to edit the /etc/chatscripts/provider file, which contains the modem/GPRS commands to make the actual connection from the cell phone to the service provider:
$ vi /etc/chatscripts/provider
then put the following in the file:
TIMEOUT 35
ECHO ON
ABORT ‘nBUSYr’
ABORT ‘nERRORr’
ABORT ‘nNO ANSWERr’
ABORT ‘nNO CARRIERr’
ABORT ‘nNO DIALTONEr’
ABORT ‘nRINGINGrnrnRINGINGr’
” rAT
OK ‘AT+CGDCONT=2,”IP”,”internet.com”‘
OK ATD*99***1#
CONNECT “”
Again, keep in mind that these settings are specific to Rogers communicatoin. Essentially they are the values that are used by your cell phone to make an Internet connection, and can ususally be found in your cell phone internet settings or obtained directly from your mobile providers technical support.
To make the actual connection from the laptop, the bundled /usr/bin/pon command will initiate the PPP call over the Bluetooth DUN to the cell provider. To deactivate the connection , the /usr/bin/poff command is used. In order to tie this whole process together, and reduce it to a simple command for activation/deactivation, I created a script that automatically gets my channel number, passes it to the rfcomm command, then calls the /usr/bin/pon program:
$ vi /usr/bin/pon2.sh
#get the channel for the connection
CHAN=`sdptool search –bdaddr 00:1D:FE:06:A0:6B DUN|grep Channel|cut -f2 -d:`
#release channel if in use
rfcomm release /dev/rfcomm0
#bind the channel
rfcomm bind /dev/rfcomm0 00:1D:FE:06:A0:6B $CHAN
#run the ppp connection
/usr/bin/pon
Now, to make an internet connectioon from my Ubuntu laptop over my cell, all I need to do is type the command:
$ pon2.sh
To disconnect, I enter:
$ poff
To make it even simpler, one can add these commands as icon’s on the desktop, making a mobile net connection just a click away. Remember that your browser expects a network connection to use the internet, so it may say that it is working in off-line mode, even though your mobile Internet is working fine. Just change the off line status for the browser, and you sould be good to go!
References
http://www.spiration.co.uk/post/1307/Ubuntu Linux – Bluetooth and GPRS dialup connection
https://help.ubuntu.com/community/BluetoothDialup/Vodafone
http://www.smartphonethoughts.com/news/show/15564/3/1/5